


 02 9649 2111


Share




Installing a ceiling hoist in your home is one of the biggest steps you can take toward safer, easier transfers. It changes how a bedroom, bathroom or living space works day to day. A bit of planning before the installers arrive speeds up the process and helps you get the most out of your new equipment.
This guide walks through what to check and prepare before your ceiling hoist installation, from clearing the right rooms to making sure your hallways and doorways are wide enough for smooth transfers between spaces.
Step #1: Start with a professional occupational therapy assessment

Every home is different, and so is every person's transfer routine. Before you commit to a layout, book an assessment with an occupational therapist who can map out exactly where a hoist and track will do the most good.
This is also a required step if you're applying for NDIS funding, since a qualified OT must confirm that the modification is reasonable and necessary before approval.
Your OT will look at how you move between the bed, bathroom, and living areas now, and where a track could remove the most strain. Bring along your support worker or family members to this visit; they're often the ones handling day-to-day transfers, and their input on what's working and what isn't will help shape a better outcome.
This assessment also helps you plan for the future, not just today's needs. If your condition is progressive or your mobility needs are likely to change, a track that only covers the bedroom now might not be enough in a year or two. Discussing this early means your ceiling hoist installation can be designed to extend later, rather than starting again from scratch.
Step #2: Clear the rooms your patient lifting equipment will pass through
Once you know your track layout, walk through every room it will cross and start clearing. Furniture, rugs, cords, and clutter along the transfer path all need to go, even if they seem out of the way now. A ceiling hoist track often runs in a straight line between rooms, so anything sitting under that line will need to be moved permanently.
Pay close attention to bedside tables, wardrobes, and any furniture near doorframes. These are the pieces people forget about until installation day, when they suddenly become obstacles. If you're unsure whether something will interfere with the track, our team can talk you through it during your consultation.
It's also worth thinking about the transfer points themselves, not just the path between them. The bed height, the position of a wheelchair or commode, and the space around a shower or bath all affect how comfortably a hoist and sling can be used.
If a transfer point is going to change, such as swapping a bath for a roll-in shower, plan that renovation alongside your ceiling hoist installation rather than afterwards.
Step #3: Check your doorways and hallways meet accessible width standards
Doorway and corridor width matter just as much as the track itself. Under the Australian Building Codes Board's Livable Housing Design Standard, doorways along a home's main path of travel should have a minimum clear opening of 820mm, with corridors at least 1000mm wide. These figures are a useful benchmark even if your home wasn't built to this standard.
Measure every doorway and hallway your hoist track will cross, not just the room where the hoist will be used. A wheelchair or hoist sling that clears the bedroom door but gets stuck in the hallway defeats the purpose of the whole system. If a doorway is too narrow, widening it is usually a straightforward carpentry job, and it's worth doing before your ceiling hoist installation date rather than after.
Don't forget thresholds either. A raised doorframe lip of more than a few millimetres can catch a sling or a wheelchair wheel during a transfer.
Step #4: Plan for power access near your hoist track
Most ceiling hoists run on a rechargeable battery, which needs a charging point somewhere along the track. Think about where a power outlet is, or could be added, close to where the hoist will dock when it's not in use. Placing this near the bed is common, since that's usually where transfers start and end each day.
If your electrical setup needs updating to support this, it's worth arranging with an electrician alongside your other preparations. Getting the power point sorted before installation day means your hoist is ready to use as soon as the track goes up.
Step #5: Think about ceiling strength before your ceiling hoist track system goes in
A ceiling hoist track carries real weight, so the ceiling and roof structure need to support it safely. In most homes, this means adding reinforcement, such as timber noggings or steel plates, above the plasterboard along the track's path. This is a structural job and should be assessed and signed off by a qualified builder, architect, or occupational therapist as part of your home modification.
If you're renovating or building new, it's far easier and cheaper to install this reinforcement while the ceiling is still open. If you're retrofitting an existing home, our specialist team can assess your ceiling cavity and recommend the right reinforcement method for your situation, whether that's a single-room track or a full ceiling hoist track system running between multiple rooms.
Step #6: Plan your track layout and consider a gantry system for flexibility
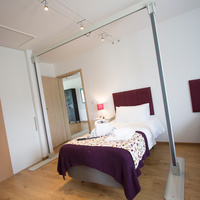
Not every home needs a permanent, ceiling-mounted track. If you're renting, planning a future move, or your ceiling can't take a fixed track, a gantry system offers a flexible alternative. Gantry systems sit on a freestanding frame rather than being fixed to the ceiling, so they can be installed without structural changes and later moved to another home.
For homes with a permanent setup, consider how you want to move between rooms, not just within a single room. Door connectors, curved rails, and turntables all allow a single ceiling hoist to travel from the bedroom to the bathroom or living area without needing to be unhooked and remounted.
Mapping this out with your occupational therapist and our team before installation avoids costly changes later.
Step #7: Book your ceiling hoist installation with a trusted team
Once your rooms are cleared, your doorways checked, and your ceiling assessed, you're ready to book your ceiling hoist installation. As an NDIS-registered provider with over 30 years of experience, we work alongside your occupational therapist and support workers to ensure your new hoist and track fit your home and daily routine.
Talk to your occupational therapist about your plan, then get in touch with one of our ceiling hoist specialists to arrange a home assessment and quote. You don't need to be NDIS-funded to install a hoist—many of our customers choose to self-fund their ceiling hoist installation, and our team can talk you through your options either way.
For larger projects, such as hospitals, aged care facilities, or Specialist Disability Accommodation (SDA) builds, we often work directly with the home builder or project manager from the early planning stages. This means ceiling reinforcement and track layout can be built in from the start, rather than retrofitted later.
Visit one of our showrooms to see a working ceiling hoist and track system in action, or get in touch with our team to arrange a home assessment. We're here to help you restore independence in every room your new equipment will reach.
Other common FAQs about ceiling hoist installation
How long does a ceiling hoist installation take?
It depends on your home and the amount of ceiling reinforcement needed. A single-room track with no structural work can often be fitted in a day, while a multi-room ceiling hoist track system that needs reinforcement will take longer. We'll give you a clear timeframe once we've assessed your home.
Do I need my landlord's permission to install a ceiling hoist in a rental property?
Yes. If you're renting, you'll need written consent from the property owner before any home modification goes ahead, and NDIS funding for modifications to a rental also requires this consent upfront. If a fixed track isn't an option, a gantry system is worth considering, since it doesn't require permanent ceiling changes.
What's the difference between a ceiling hoist track and a gantry system?
A ceiling hoist track is fixed to your ceiling and needs structural reinforcement to support it. A gantry system sits on a freestanding frame instead, so it can be set up without any changes to your ceiling and can move with you if you relocate.
How much does a ceiling hoist installation cost?
Cost varies depending on your home's layout, whether ceiling reinforcement is required, and which hoist and track system you choose. We provide a tailored quote after your home assessment, so you know exactly what's involved before you commit.
Do I need council approval to install a ceiling hoist?
In most cases, a ceiling hoist installation is considered an internal modification and doesn't require council approval. Structural work like ceiling reinforcement still needs to meet the National Construction Code, so it's worth checking with your builder or occupational therapist about what applies to your specific property.